
Honiton Lace 1
Many people peceive Honiton to be a difficult lace, only to be attempted after the other laces. This is a misconception and a very sad one at that. People often put off trying Honiton until it is too late. Later on in life our eyesight deteriorates, it happens to most of us. When this happens learning Honiton can become really hard work. The truth is, Honiton lace is not intrinsically more diffficult than any other lace although it can be more challenging technically. Finer threads aslo make the lace much slower to work so a greater deal of patience is needed. If you like the look of Hontion Lace and want to have a go at it, do it now, don’t put it off until later.
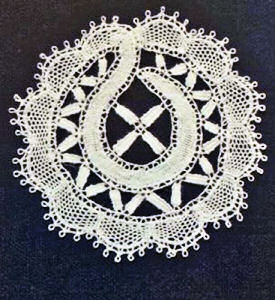
Leadworks are often a problem at Stage 1. Don’t be too concerned about them, the assessor knows quite well that a great many leadworks need to be worked before they look really even. Compare the two lace pieces below. This little shell pattern is typical of a stage 1 piece of Honiton. In the first picture, the leadworks are uneven, some are very pulled but others are quite good. The lacemake has shown that she knows the techniques required, consistency will come with more practice. If the same piece is worked at Stage 2 (second picture) then far neater leads are expected.
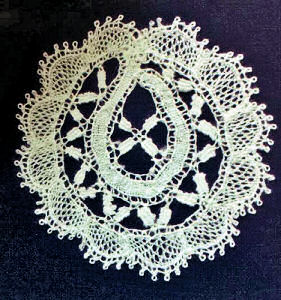
120/2 thread is acceptable as a choice for stage 1 pieces. A piece worked neatly in heavier thread can often look much nicer than a piece in fine thread where the tension is not so good or pinholes are pulled out of shape due to inexperienced sewing. Only move on to finer threads if and so when you feel comfortable to do so. DMC Broder Machine 30 (or equivalent) is a good choice for the coarse thread no matter which fine threads are used. Do not use a finer coarse thread if you move on to using 180/2. Course threads are meant to be seen, they give emphasis to the outline of the lace.
Sewings are an intergral part of Honiton lace. Try and use a needlepin right from your very first piece. It really is the best tool for taking sewings. In the early stages it is often tempting to use a crochet hook or a beading needle but later when doing raised work you may need to sew into a single pinhole as many as four times. The very fine point of a needlepin will often be the only possible way to achieve this. Confidence with a needlepin will only come with use. And please, never try to do sewings using a wig hook, they often can be very sharp and cut through threads.
Some books will tell you to use fine lace pins and to push them down every other pin as you work, removing the alternate pins. The reasoning behind this is that some pinheads are rather large and if every pin were pushed down, the pinheads would lie on top of each other and the threads would catch and break. The only problem with this method is that it can result in a wavy pinhole edge. A better idea is to use very fine Duchesse pins. These have tiny heads so every pin can be pushed down which results in a far neater edge.
You are asked to show a purl edge. Although it is not specifically asked for in the requirements, it is a good idea to show that you can do both left and right handed purls. A simple butterfly design with left handed purls along one edge and right handed purls along the other edge, can show this to good effect.
Finally, do not automatically unpick any mistakes you have made. Ask yourself, will anyone notice other than myself? Remember that fine threads will not stand very much unpicking. These are no exhibition pieces, they are learning pieces. Sometimes it is better to leave a mistake and learn from it rather then risk breaking threads. But always write down your mistakes to let the assessor know you recognise what you have done wrong. You will not be penalised.
© Extracted from The Journal of the Australian Lace Guild ~ August 2013
Honiton Lace 2
Stage 2 is where you really get a feel for the scope and possibilities of Honiton Lace. The patterns available to you will be far more interesting. They will challenge you to think for yourself, decide where you will start lace, in what order different elements will need to be completed and what fillings you will use. The lace will become your own interpretation of a pattern, not just a copy of someone else’s lace. The general guidwlines state that Stage 2 requires a considerably higher standard that that accepted for stage one. This means that a lot more thought needs to go into choosing as well as executing your patterns. Source your patterns from as many books or magazines as possible, this will show the evidence of wider reading.
The requirements are subtitled Complex Flat Honiton, so the patterns themselves need to be more complex. It is not just a matter of putting more complicated fillings into an otherwise easy pattern. Look for patterns that have interesting shapes like leaves that have awkward points, patterns that are technically challenging – some patterns require you to leave one set of bobbins aside and work a different section before coming back and finishing off the work.
You are asked to make an edging and there are not many published edgings available so why not design your own or adapt a pattern. Maybe take elements from several patterns and combine them. Just make sure that you acknowledge the original designer of any patterns you change.
A good clean accurate pricking is essential. Always use a card pricking not a photocopy with contact on it. There are two reasons for this. First, when a pin is removed from lace made using contact, a minute amount of adhesive can be picked up by the pin and be transfered to your lace. Even a tiny amount of stickiness on lace will attract dust and dirt and your lace will not look as clean as it should. Second, many patterns you will use will be from one or other of the published books on Honiton Lace, so be aware that some books contain printer’s errors, patterns may have small mistakes in them, pinholes missing etc. Never assume that the pattern is 100% correct. It is up to you to take responsibilty for correcting the alignment or spacing pinholes. It is a simple matter to correct pinhole placement whilst the card pricking is being made.
Fillings need to be pricked accurately and this means using graph paper every time. The area of filling must be large enough to show several repeats of the filling. The reason for this is to show the assessor that not only do you know how to do a filling but also that you are capable of reproducing the filling accurately over a large area. Generally it is not a good idea to use sampler patterns for your fillings as the spaces can be far too small. it is not always possible to incorperate all the fillings required into the completed pieces of lace and it may be worth considering working some fillings as samples within a square of rib or whole sitch braid. As a general rule a minimum of 10 to 12 repeats of the filling would be expected.
A sharply turned scroll however needs a different approach. A backstictch is started at the pinole in the neck of the scroll, runner pairs work at the outer edge where they become passives. This happens several times until the scroll has been turned 90° finally the backstitch is made up. The method is described in both The technique of Hontiton Lace by Elsie Luxton and in A manual of handmade bobin lacework by Margaret Maidment.

Try to include as many variations of leaves, veins, decorative holes etc. as possible to keep the design interesting. Although you are not required to attempt any raised work yet, some people like to have a go at this stage. If you do, it will add depth and interest to youe lace.
© Extracted from The Journal of the Australian Lace Guild ~ Summer 2013 – 2014
Honiton Lace 3
Stage 3 is essentially the practical part of the teacher’s certificate and therefore as mentioned in the general guidelines that a very high standard is required. As an expert your lace should be compare favourably with lace shown in books published overseas by Honiton teachers, and not just the easy patterns either but the big, difficult, stunning pieces that are always found at the end of the book. Over the course of the first two proficiency stages you are asked to demostrate 13 named fillings. There are over 200 named fillings documented in various textbooks and so at Stage 3 we would expect you to include some of the more complicated oned, as well as some raised fillings. We don’t tell you which ones to do, it is up to you to demostrate your capabilities.
The list of requirements is quite small compared to techniques available to the Honiton lacemaker, therefore they should be considered minimum requirements. Your workbook needs a certain degree of WOW factor, this is your chance to show us just what you can do.
You are asked to produce four major pieces, each of these pieces need to show raised and/or rolled work. A piece of flat Honiton, no matter how complex, is considerd Stage 2 work and would not be accepeted as a major piece. As mentioned above, a certain degree of WOW factor is needed, though it is not neccessary that all the major pieces are large. Raised work in Honiton is always very time consuming and the assessors are well aware of this. A small but technically challenging sprig can be perfectly acceptable as a major piece.
You are asked to produce one piece that is grounded, so what is the difference between a filling and a ground? The difference is not so much in the stitches themselves but in their use. A filling is a decorative and often elaborate stitch used to fill the center of a flower or other motif. A ground is a background, often of net or bars between seperate complete sprigs. Any filling stitch can be used as a ground. Most pieces of Honiton lace are simply sprigs, complete in themselves. They are often framed and used as pictures. If you wish to make a mat, collar, fan or other large piece, then sprigs will need to be joined together. Using a ground stitch is the way this is done and at the same time the ground will stabilise the lace.

The rib around the edge and the ground (Jubilee) hold all the elements together.
Because Honiton lace is slow to work, doing Stage 3 will certainly take up quite a bit of your time so it is important to remember that this is a hobby and supposed to be fun. Try not to make fine lace when you are tired or under pressure as that is always when threads will break or you will make mistakes!
© Extracted from The Journal of the Australian Lace Guild ~ Autumn 2014
In Conclusion
Do not get discouraged, these notes are a guide and hopefully be a bit of help. They have been put together by an ALG Proficiency Assessor.