
Tatted Lace
Of all the different types of lace, tatting has shown the most development over the past twenty-five years. Regarded by some as a minor lace, tatting has become very fashionable in the 21st century. By undertaking the Stages of this Tatting Proficiency, you will enjoy a wonderful personal challenge. You will start at the traditional basics, then apply and develop these before launching into your own creative work.
The following notes have been prepared by an ALG Accredited Teacher of Tatting to help you create your proficiency workbook. They are to be read in conjunction with the Guild’s General Guidelines for lace-makers, and the respective Requirements for each Stage.
In the 21st century books are only one source of patterns and research material. For your own information, if nothing else, it would be useful to include CDs, DVDs, YouTube demonstrations and Internet sites which you have consulted, creating a ‘reference list’ rather than the required ‘bibliography’ for each Stage. Include the date accessed for online material. These will then become invaluable in the future, but your reference lists must correlate with the individual Stage requirements.
Stage 1
Motifs and medallions form the majority of Stage 1 samples, which must be displayed in your Stage 1 workbook in order of working. You are asked to submit ten of these, demonstrating application of the requirements, i.e. various shapes using rings and chains, and other features listed. As you will need to distinguish between a medallion and a motif, you will find Elgiva Nicholls’ book, “Tatting: Technique & History” (Dover, 1984) is a wealth of information. She devotes a whole chapter to the study of medallions, their shapes, repetitions and centres. In the book’s glossary there are definitions for ‘medallion’ and ‘motif’. Note the floral motifs in the first picture of the medallion and braid below.


Study all medallions to discern the different types of centres – central ring, enclosed space, shared picot, as illustrated in the second of the pictures above. There are differing opinions about the sizes of such medallions for your workbook. However, Guideline 10 states that they are to be ‘of sufficient size to demonstrate clearly the techniques required’. As you select your medallions, choose several simple edgings as well, as you will use these when you demonstrate mounting by hand.
An insertion is a length of lace with two footsides, while an inset (or insert) can be any shape. When the latter is set into fabric, close buttonhole stitch may be used, after which the background fabric is cut away.


The phrase “traditional application of the above” appears at the bottom of Stage 1. This is easy to overlook. The whole of Stage 1, apart from 2-colour tatting, expects you will study this earlier period of tatting (up to 1950-60). It is the foundation on which contemporary tatting builds. Some attributes of traditional tatting are:
- one solid colour – mostly white, ecru, cream, black but occasional colours
- many even picots
- two-sided using RW (reverse work), i.e. rings on one side, chains on the other. This may help when you receive your sample from the Lace Guild Pool.
- upward joins at picots
- single-shuttle medallions and edgings.
A few extra tips:
- Always use good quality, mercerised threads. Try to use plain, light colours for clarity: variegated threads can detract from the design.
- As you consider lock(ing) stitch, be aware that one lock stitch can create a mock picot when climbing out of a central ring – a fourth type of picot to be added to the other three required.
- There are several methods of mounting tatted edgings to fabric by hand, so demonstrate a variety of these.
- Use even tension and smooth picot joins. Be sure to block your samples well to improve their presentation. Remove any fluff or pet hairs.
Stage 2
As the requirements for this Stage encourage you to use both traditional and modern applications in your lace, you can enjoy exploring colour, multiple shuttles (or needles), beads and various types of threads. One of your major pieces is to be of modern design. However, merely applying colour to a traditional design does not transform it into a modern design.
The General Guidelines remind you that the standard of work for Stage 2, should be considerably higher than what you produced in Stage 1. Also, this time the samples in your workbook may be arranged in whatever order you choose to present them.
Modern tatted lace is still evolving. There are, however, discernible contemporary features:
- fewer decorative picots, to none at all
- smaller joining picots
- downward picot joins
- designated front side (directional tatting)
- reverse stitch (unflipped double stitches)
- reverse order double stitch
- split rings and split chains
- textured and 3-dimensional articles
- mixed colours and threads
- inclusion of beads, found objects or metal
One requirement of Stage 2 is that shuttle tatters must present a reasonable piece of needle-tatted lace to demonstrate their proficiency in this method. Likewise, it is expected of needle tatters that they demonstrate their proficiency in shuttle tatting. Proficiency in both methods will also be advantageous should you undertake your Teacher’s Accreditation.
This Stage includes a history component. The development and history of tatting will prove quite fascinating. From early knotting to twenty-first-century tatting there have been many developments, uses and interesting people, even a reigning queen. Keep an open mind about the various proposed origins of this form of lace, as you are not required to prove any of them. Begin your research early, as you will find that you have to condense what you discover to meet the summary requirement. Online you will be able to access many ‘antique’ libraries to study early texts in a variety of languages. Always state your sources of information accurately.
A few extra tips:
- Present a variety of thread types and thicknesses. If you use a variegated thread, do this wisely so that it does not detract from the design.
- Beads need to suit the thickness of the thread used. Demonstrate a variety of placements in your lace.
- Be sure your samples are clean, and block them to improve their presentation.
- In your notes you can add any self-evaluation or comment that is relevant.
Stages 3 and 4
These Proficiency Stages are where you can make a decision regarding how much you would like to undertake, and the time you can devote to your choice.
You have three choices. Stop after the Stage 3 Proficiency, do Stage 3 and Stage 4 separately or do Stages 3 and 4 together. The content of Stage 4 includes a series of lessons and sample pieces you must design to teach a chosen topic in tatted lace. Your work should be of a very high standard at this level, and you must demonstrate many advanced techniques. These can be used with any style: traditional, modern and free-form are all acceptable. Research at this level is very important, and your workbook should reflect this.
For Stage 3 you are required to submit four major pieces, which may be original, a published pattern or an adapted design. The adaptions you make to any design should be substantial, not just a few variations to picots or stitch counts. They should be obvious at first glance.
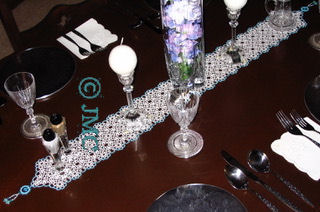
The table runner below is a good example of a Stage 3 piece. It is 1 metre long, and has used a basic square medallion designed by Mary Konior. The tatter has then devised a matching edging to finish the runner, as well as a similar triangular motif at each end. Mary Konior’s original design has been adapted in two ways to produce a very attractive article.

In Conclusion
(Extracted from The Journal of the Australian Lace Guild ~ Autumn 2015, Spring, Summer and Autumn 36/1,2,&3.)